Showing posts with label Technology. Show all posts

An Indian Railways API Set


Hi Folks,

I have a very good news for people who try to access www.irctc.com website to find about seat availability, PNR status, railway station by name etc. Now we can actually get this information using API's which are released for ease of use.

What are API's?
 API or Application Program Interface, is a set of predefined protocols, routines and tools for building some software applications. A good API makes it easier to develop a program by providing all the building blocks.

 
Different Indian railways APIs, provided by RailPNRAPI, serves the same purpose. They are simple web based APIs for checking PNR status, getting station information by station code, checking Indian railways train route and schedule, checking seat availability and much more.

The output of Indian railways APIs can be get in XML and JSON formats based on your need.

For complete list of available API's and details see here

Home Surveillance – Real time Home monitoring using Skype

Consider that you are on a day out with your family and then you want to know how safe your house is without spending much! – What to do? And how to do? How to avoid spending money over home surveillance? If any of the questions arises in your mind then I have simple solution for you. After making this blog post into action you can relax and spend your time on your vocations without worrying much. This idea even helps to monitor your babies at home!

Isn’t it sounds great? So let’s get started with Home Surveillance set up:

What you need to have:
  • Laptop (or desktop) at home with webcam.
  • Internet with moderate bandwidth and speed.
  • Smartphone.
Procedure:
  • Download and install Skype from (http://www.skype.com/en/download-skype/skype-for-computer) on your home computer and create an account (let’s say home_skype).
  • Download and install Skype from (http://www.skype.com/en/download-skype/skype-for-mobile/) on your smartphone and create another account (let’s say mobile_skype).
  • Add each other’s Skype account into respective friend list.
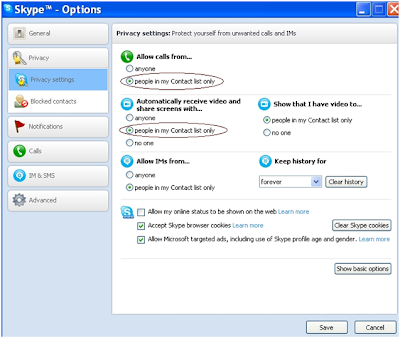
  • In your home_skype account, go to Tools->Options->Privacy, click on “show advanced options” and set the following:
  • Set “Allow calls from” to “people in my contact list only”
  • Set “Automatically receive video and share screens with” to “people in my contact list only

A screenshot of the settings:


That’s it. All the settings are done. You don’t have to do these on your mobile_skype account

Typical use case scenario:

Login to Skype into the home laptop (home_skype account) and place the laptop in your house in such a way that it faces the entrance (or any place that you want to monitor). Login to mobile_skype account on your smartphone and make a video call to the home_skype account.

Due to the above settings, the home laptop Skype account will automatically accept the call and start streaming the video to your smartphone and thus you will be able to monitor your home in real time and on demand basis by making video call to the home account any number of times a day.

Alternate components/devices:

If you do not have a smartphone, you can login to the mobile_account from any laptop/desktop and make a video call to home account to monitor in real time and on demand.

Alternate use cases:

-It can be used to monitor baby or the babysitter so that working parents can work peacefully in offices instead of worrying about issues like these:

http://articles.timesofindia.indiatimes.com/2009-11-06/bangalore/28106781_1_nanny-baby-parents

Tips:

-To save power, switch off the laptop screen and set the processor to low power mode.

-Ensure that it does not go into sleep mode after sometime.

-Ensure that you have an unlimited home broadband plan because being logged into skype for long time (even if you do not make calls) consumes bandwidth.

-If your webcam does not have sufficient coverage, you can fix convex lens in front of the camera to increase its coverage up to 180 degrees. Even door viewers like these can be used:

http://www.ebay.in/itm/Door-Viewer-Peephole-for-Home-Metal-180-Degree-/261232970230?pt=LH_DefaultDomain_203&hash=item3cd2b2c9f6&_uhb=1#ht_3951wt_1139

JAutodocs for auto comments

Hi today I had seen one useful eclipse plugin for generating comments into your source code automatically, today I am writing an introduction about the same. Lets try to utilize this plugin...

JAutodoc is a very useful eclipse plugin which helps in generating javadoc style comments very easily. Apart from adding the template for javadoc style comments for the class/method & attributes it is smart enough to add the description also based on the signatures. This can cover a substantial part of description creation effort for the methods like the setters/getters etc which do not need much human skills to generate the descriptions.

For more information on how to install and use please visit the official site for JAutoDocs at http://jautodoc.sourceforge.net/

Hope you will find it useful.

How to convert Byte[] array to String in Java

In some cases, we have to convert String variable into a Byte array format, for example, JCE encryption. However how do we convert a Byte[] array to String afterward?

Simple toString() function like following code is not working property. It will not display the original text but byte value.

String s = bytes.toString();

In order to convert Byte array into String format correctly, we have to explicitly create a String object and assign the Byte array to it.

public class TestByte
{
public static void main(String[] argv) {

String example = "This is an example";
byte[] bytes = example.getBytes();

System.out.println("Text : " + example);
System.out.println("Text [Byte Format] : " + bytes);
System.out.println("Text [Byte Format] : " + bytes.toString());

String s = new String(bytes);
System.out.println("Text Decryted : " + s);
}
}

How to change the port number of tomcat?

Now today lets learn how to change the tomcat port number? Whether it is Apache Tomcat 5 or Tomcat 6, by default Apache Tomcat runs on port 8080. But there can be situations where there are some other servers running on this same port forcing you to change the port of one of the servers.

This article explains how to change this port 8080 on Tomcat (tested this against Apache Tomcat 5.5 and 6.0 versions).

Here we’ll be using label to denote the folder where Tomcat is installed. In my system, tomcat is installed in the following path.

C:\Java\Tomcat_x.x

We need to edit the file named server.xml inside \conf folder.


In the server.xml file; locate the following segment.
By changing this 8080 value of port attribute, server would start listening on new port number.
After saving the changed server.xml file, Tomcat server must be restarted (stop then start) to activate the change. Hope you find it useful!

Time Picker using HTML and Java Script

Today while migrating the application, I was in need of having a textfield which takes time as an input. For this reason I needed a time picker, which will help the users to enter the time just by selecting something. I searched in web for this and found one from http://www.nogray.com/time_picker.php. This is very useful source for some most widely used javascripts like calendar, color picker, menubar etc.

Simple, basic but much needed things in java

It is often needed to convert one type of objects into another type in java. Below I have mentioned about these common types as they form basic foundation in java.

* How to convert String to boolean?

String listing = "true";
boolean theValue = Boolean.parseBoolean(listing);

* How to convert boolean to string?

public class BooleanToString {
public static void main(String[] args){
boolean b = true;
String s = new Boolean(b).toString();
System.out.println("String is:"+ s);
}
}

* How to converting string to date?

public class StringToDate {
public static void main(String[] args) {
try {
String str_date="11-June-07";
SimpleDateFormat formatter ;
Date date ;
formatter = new SimpleDateFormat("dd-MMM-yy");
date = (Date)formatter.parse(str_date);
System.out.println("Today is " +date );
}
catch (ParseException e)
{
System.out.println("Exception :"+e);
}
}
}

* How to convert date to string?

import java.util.*;
import java.text.*;
public class DateToString {
public static void main(String[] args) {
try {
DateFormat formatter ;
Date date ;
formatter = new SimpleDateFormat("dd-MMM-yy");
date = (Date)formatter.parse("11-June-07");
String s = formatter.format(date);
System.out.println("Today is " + s);
} catch (ParseException e)
{System.out.println("Exception :"+e); }

}
}

Clipboard Hack Problem - News about CTRL+C

Ctrl+C may be one of the most frequently used keyboard shortcuts we use every day. But it's not a very safe thing to do while you are surfing the internet.
Read on to know why.


What happens when you press Ctrl+C while you are online? We do copy various data by Ctrl + C for pasting elsewhere. This copied data is stored in clipboard and is accessible from the net by a combination of Java scripts and ASP. This is called clipboard hack problem.

Just try this:

1. Copy any text by Ctrl + C
2. Click the Link: http://www.sourcecodesworld.com/special/clipboard.asp
3. You will see the text you copied was accessed by this web page.

Surprised!. Do not keep sensitive data (like passwords, credit card numbers, PIN etc.) in the clipboard while surfing the web. It is extremely easy to extract the text stored in the clipboard to steal your sensitive information. It is true, text you last copied for pasting (copy & paste) can be stolen when you visit web sites using a combination of JavaScript and ASP (or PHP, or CGI) to write your possible passwords/credit card no./sensitive data to a database on another server.

How Clipboard Hack is done?
The Clipboard hack is done by the following Source Code:


How to safeguard yourself from Clipboard Hack Problem?
To avoid clipboard hack problem, do the following:

1. Go to internet options->security.
2. Press custom level.
3. In the security settings, select disable under Allow paste operations via script.

Now the contents of your clipboard are safe.

Interestingly, this hack works only on internet explorer, and not on Mozilla Firefox browser.

Please spread awareness of this issue with CTRL+C & help in preventing online-frauds…

How to find your Servlet, JSP and Server version?

Today when I was doing something my colleague asked me about what version of JSP and Servlet are you using. Untill now I never bothered about this, but later found a way for this. below are the lines of code to know what version of servlet you are running, version of JSP and application server you are running.

Servlet Version :
<%= session.getServletContext().getMajorVersion() %>.
<%= session.getServletContext().getMinorVersion() %>

JSP Version :
<%= JspFactory.getDefaultFactory().getEngineInfo().
getSpecificationVersion()%>

Server Version : <%= application.getServerInfo()%>

How to Use Remote Desktop in Ubuntu 8.10

vino is VNC server for GNOME.VNC is a protocol that allows remote display of a user’s desktop. This package provides a VNC server that integrates with GNOME, allowing you to export your running desktop to another computer for remote use or diagnosis.

By default ubuntu will come with vino-server so it is very easy to configure to enable remote desktop sharing in your ubuntu machine.If you want to access ubuntu machine remotely you need to login in to your ubuntu system.

Important note :-

Remote Desktop will only work if there’s a GNOME login session.Leaving your computer with an unattended GNOME login session is not secure and not recommended.

Some Tips

1) You can lock your screen using System--->Quit

Once you click on quit you should see the following screen here you need to select lockscreen

2) switch off your monitor when computer is left unattended

Configuring Remote Desktop

First you need to go to System -> Preferences -> Remote Desktop

Once it opens you should see the following screen

In the above screen you need to configure remote desktop preferences for sharing and security

For Sharing

you need to tick the box next to the following two options

Allow other users to view your desktop
Allow other users to control your desktop

For Security

you need to tick the box next to the following two options

Ask you for confirmation (If you tick this option some one need to click on allow from remote desktop once it connected if you don’t want you can untick this option)
Require the user to enter this password:
Password: Specify the password

Connecting from Ubuntu Machine

Open your terminal from Applications--->Accessories--->Terminal and enter the following command

vncviewer -fullscreen 192.168.2.23:0

now you should see the following message asking for password enter the password after complete success you can see VNC authentication succeeded message and starting remote desktop

VNC viewer version 3.3.7 - built Jul 4 2006 10:04:48
Copyright (C) 2002-2003 RealVNC Ltd.
Copyright (C) 1994-2000 AT&T Laboratories Cambridge.
See http://www.realvnc.com for information on VNC.
VNC server supports protocol version 3.7 (viewer 3.3)
Password:
VNC authentication succeeded

If you want to quit vncviewer

Press ‘F8′ and select Quit viewer

Connecting from Windows machine

If you are trying to connect from your windows machine you need to install vncviewer of your choice i have installed from here http://www.realvnc.com/download.html.Install this program once you install this you can opem from start--->All programs--->RealVNC--->VNC Viewer 4--->Run VNC Viewer once it opens you should see the following screen here enter the remotemachine ipaddress:0 format and click ok

Now it will prompt for password enter your password and click ok

Now on the remote machine you should see the following screen asking for permission to allow this connection you need to click on allow this will comeup only if you tick “Ask you for confirmation” option under sharing

Once it connected you should see the remote machine desktop like the following screen

Creating Google gadgets with GWT

Create a new GWT/AppEngine project


Modify SimpleGadget.gwt.xml file:

xml version="1.0" encoding="UTF-8"?>
DOCTYPE module PUBLIC "-//Google Inc.//DTD Google Web Toolkit 1.7.0//EN" "http://google-web-toolkit.googlecode.com/svn/tags/1.7.0/distro-source/core/src/gwt-module.dtd">
<module rename-to='simplegadget'>


<inherits name="com.google.gwt.user.User" />
<inherits name="com.google.gwt.gadgets.Gadgets" />
<inherits name="com.google.gwt.http.HTTP" />
<stylesheet src="hello.css" />

<entry-point class='com.taktico.simplegadget.client.SimpleGadget'/>
module>


Modify SimpleGadget.java

package com.taktico.simplegadget.client;

import com.google.gwt.gadgets.client.Gadget;
import com.google.gwt.gadgets.client.UserPreferences;
import com.google.gwt.gadgets.client.Gadget.ModulePrefs;
import com.google.gwt.user.client.ui.Label;
import com.google.gwt.user.client.ui.RootPanel;

@ModulePrefs(title = "SimpleGadget", author = "Uki D. Lucas", author_email = "UkiDLucas@mac.com")
public class SimpleGadget extends Gadget
{
@Override
protected void init(UserPreferences preferences)
{
RootPanel.get().add(new Label("Hello World!"));
}
}

Modify SimpleGadget.html


DOCTYPE HTML PUBLIC "-//W3C//DTD HTML 4.01 Transitional//EN">
<html>
<head>
<meta http-equiv="content-type" content="text/html; charset=UTF-8">
<link type="text/css" rel="stylesheet" href="SimpleGadget.css">
<title>Web Application Starter Projecttitle>
<script type="text/javascript" language="javascript" src="simplegadget/simplegadget.nocache.js">script>
head>
<body>
body>
html>


Add gwt-gadgets.jar to your project


Compile the project


Post (deploy) the compiled directory on the Web (e.g. iDisk)


Open iGoogle -> Add Stuff -> Add feed or gadget -> paste your deployed gadget URLhttp://homepage.mac.com/ukidlucas/google_gadgets/simplegadget/com.taktico.simplegadget.client.SimpleGadget.gadget.xml


Finished SimpleGadget in iGoogle

Bhuvan, (Sanskrit: भुवन, lit: Earth) launched by ISRO

ISRO launched the beta version of its web-based 3-D satellite imagery tool, Bhuvan, on August 12, 2009. Bhuvan will offer superior imagery of Indian locations compared to other Virtual Globe software with spatial resolutions ranging from 6 m to 55 m. Locations can be viewed from different perspectives and will allow for the measurement of distances. The Bhuvan portal is designed to run on slow Internet connections. The imagery would steer clear of all sensitive military installations in India for security concerns.

Bhuvan displays better images of India than the ones relayed by Google Earthweatherstates and districts, relevant only to the country. Bhuvan is equally capable of offering images of the globe, but the best resolution area includes India at the moment. In the Indian subcontinent, Bhuvan will be able to display a picture from ten meters away that is; a commuter moving on the road can be easily spotted.[5] along with a number of other interesting features which include information and even administrative boundaries of all

File:Bhuvanscreenshot.jpg

National Remote Sensing Agency played an important role in the creation of this product. ISRO has used data provided by satellites including Resourcesat-1, Cartosat-1 and Cartosat-2 to get the best possible imagery for India. ISRO claims that the application can provide imagery of up to 10 metres for major Indian cities compared to 200 meters provided by Google Earth.

Google launches a major offensive against Microsoft

The clash between Microsoft and Google has turned more intense. First, Google announced its first operating system, Chrome. Then Microsoft announced the new version of Office with major cloud applications support. To increase its presence in the search engine market, Microsoft recently announced its deal to take over Yahoo's search business. Now, Google has announced the launch of its new promotional campaign called 'Going Google.'


The main target of 'Going Google' campaign is to topple Microsoft's hold in office applications. Google will soon launch a series of advertisements which will boast why some 3,000 organizations are signing up to use Google applications each day. Google claims that so far over 1.75 million businesses, schools and organizations have signed up to use the various combinations of Gmail, Google Calendar, Google Docs and the other Google apps. Currently, Microsoft Office has the highest market share for office related applications. Google is trying to be proactive in telling people why its solution is better than Microsoft Office.

Google will be heavily investing in the 'Going Google' campaign and it plans to advertise through billboards on four major U.S. highways that will give a new message about Google apps everyday for a month. The billboards will be placed on the 101 in San Francisco, the West Side Highway in New York, the Ike in Chicago, and Mass Pike in Boston.

Google is also attempting to use Twitter platform to spread the 'Going Google' message. At the bottom of its blog post on the matter, Google urges people who use its apps to 'Tweet your story' and provides a link to auto-populate a tweet with the #gonegoogle hashtag. You can also follow the GoogleAtWork Twitter account to follow the Gone Google stories.

Google also plans to use 'Spread the Word' campaign, which will be similar to Mozilla's campaign to promote Firefox. Google will also try to use the conventional way of sending fliers and pre-populated emails to promote its 'Going Google' campaign.

Yeah the world is looking for big war between Google and Microsoft.Thing is that Microsoft never gives any thing free so it's not giving much benefit to normal end user as opposed to Google.Google gives free many of their products.What could have happened if Google has established their company before Microsoft? I guess we would never heard the name Microsoft by then! My appreciate Google and Microsoft for all their innovations in the IT field.Lets see what happens in the future.Who will the battle? My well wishes are with Google, and I also pray Microsoft to innovate and give a damn fight.

How to add a “loading” icon to your larger images

Let’s say that you have a large image (or several large images) on a particular page, and you want to let visitors know that the image is loading. You could use a piece of javascript to embed a “loading” image for all images that have not yet loaded, but unless you are loading a ton of very large images on a single page, we have a much simpler (and cleaner) method to accomplish the same thing.

Step 1: Find a preload image.

There are many fantastic sites out there that will allow you to create your own preload images. Our favorite is here. Just remember not to choose an icon that is too large (file size), or it may not load until after the larger image has loaded. Here is the one that we have created:

loading image


Step 2: Create the CSS

There is just a little bit of code to create here, and it can be pasted directly into your stylesheet. Just be sure to replace the “youricon.gif” text with your image name.

Code to paste into your stylesheet:
.load{background:url('images/youricon.gif') no-repeat center;}

Step 3: Applying the code
There are a couple of ways to do this, but this is probably the best solution (depending on your application). Simply encase the image you are interested in loading within a “load” div, and apply the width and height of your image to the div.

Here it is applied to an image:
Example:

You will likely need to clear your cache and reload this page to see the loading icon appear. A more thorough example of this loading icon in action can be found here.

a very large image

As mentioned by contributor Lim Chee Aun below, you could also bypass the div and apply the .load class directly to the image itself, and here’s how you can do it:
alternate text

The reason we hadn’t mentioned this idea initially, is if the image does not load it can break the look of the design. If you are absolutely positive you will not have any loading issues, you don’t care if the image needs to be centered (while validating xhtml strict), or if you are applying the class to multiple images, this may be a cleaner solution for you. See our updated example page below for examples of the method created both ways.

If this solution doesn’t fix the problem for you application, let us know what you are doing differently and we’ll be happy to go into more detail.

Compatibility:
This method has been tested in and is compatible with Internet Explorer 5.5, 6, 7, Firefox (PC and Mac), Netscape and Safari (PC and Mac).

That’s all folks!

If you have an idea or article that you would like to contribute, send it on! We’re always looking for good, quality articles. Note that we will not republish an article that has been published elsewhere, so keep it original!


Show hidden files and folders not working ? Computer shuts down automatically ?

Is your right click context menu showing some Chinese scripts ? Is your show hidden files and folders not working ? Is your command prompt , Registry Editor and task manager disabled ??

If all these things are happening to your Computer , the reason is that it has got infected by a virus named " RAVMON " .What can this Virus do ??

* Disables task manager , Registry Editor and Command prompt .
* Right click menu shows some Chinese scripts as shown in the figure.
* Computer shutdown automatically and slogs a lot.
* Folder Options disappear
* Show hidden files and folders Option won't work.

With all these things not working , I can understand what can go with you !! I saw this thing on my friends PC . Then only I decided to write the solution for this.So how are you going to remove this ?

One of my friend has developed a solution to kill this Virus.Download it and remove the Virus.

Download the RAVMON virus removal Tool


One you download the tool , install it.Click on the three of them.and press OK.If you are not infected with RAVMON then the tool automatically shows the error message.So download it and enjoy using your PC.

Like Technova's solution channel ??? Subscribe here or click here to get updates via email

Access Orkut, Or anyother socialnetworkingwebsite from School or Work

In colleges students and office workers asking for workarounds to access social networking websites that are blacklisted.The most common websites that are blocked in schools include Bebo, MySpace, Hi5, Xanga, Orkut, Facebook and in some cases, Youtube. We share a couple of options to bypass the internet ban and they includes using proxy servers, special mobile websites and screen sharing software:

Trick A: Most solutions to unblock websites suggest using web proxies to bypass restrictions. has a comprehensive list of public anonymous web-based proxy servers that you may want to try. [How proxies work ?]But chances are that your school administration has already blocked access to most proxy servers as well. In that case, you have some more options:

Trick B: Surf the web using Mowser, a new service that’s free and converts any website into a mobile phone friendly format. The other option that may help access blocked website is Bitty Browser, a miniature web browser that is meant for embedding inside other web pages. Another solution may be Google Mobile Search.

Trick C: Finally, a option that will always work provided you have your sister or mom at home to help you - Use a screen sharing software like Microsoft Tahiti, CrossLoop or Yuuguu.
Ask someone at home to accept your screen sharing invitation request and browse the web at school using your home computer. This will enable you to access any website or instant messenger like Skype or Yahoo from the school or work computer. You may also try remote control software that comes with Win XP Pro instead of screen sharing apps to access restricted sites.
If Google Talk is blocked by your employer, use the Firefox Trick and connect with Google Talk buddies outside the office firewall.

Accessing unauthorized web sites using the above tricks may be considered a violation of school or work policies and might put you in trouble. Use them at your own risk.


DiggTechnoratidel.icio.usStumbleuponRedditBlinklistFurlSpurlYahooSimpy


Blocking Myspace,Orkut Manually To Restrict Children and Office Staff

Want to block porn or any illegal web content Blocking Myspace at Home or at officefrom yours home or Office system .If yes then you can do this by following simple steps mention below .This trick will really helpful for all those parents who wants to block myspace ,Facebook ,Orkut ,Youtube or any other website from there home computer in order to restrict there children to surf all those websites.

For Blocking any website (Like orkut,youtube,playboy,myspace,facebook) in which you dont want yours friends Family members etc to visits etc you have to follow below steps carefully.

  • Click the Start button and select Run. Now type the below text in Run box:

    notepad c:\WINDOWS\system32\drivers\etc\hosts

  • A New notepad window will open on your screen containing some Information. Just goto the last line of the file, hit the enter key and type the following:

Transcend rolls out 192 GB high-speed 2.5 inch SSD in India

Transcend India has launched 192GB high speed SSD for Rs 37,000. The SSD is one of the best launched so far in the Indian market either by Transcend or any other company. The launch is part of the company’s strategy to expand its operations in India. India has been a strategic market for Transcend for many years. Transcend has recently been able to achieve huge sales growth in the Indian market by working closely with selected partners such as Redington, Mediaman, Supertron, and Smart Infoway. Now Transcend products can be found in all major retail stores throughout the country. In addition, Transcend has become India’s most popular USB Flash Drive brand and has witnessed a rapidly growing demand for its MP3 players. Transcend believes that its tremendous sales growth in India is mainly due to its strong relationships with strategic partners. Transcend has been focused on providing them the high level of support they need to build brand recognition and to increase sales revenues. With joint activities and events such as vendor conferences, advertising campaigns, dealer incentives and effective technical/RMA support, the company has been able to build strong brand awareness and stimulate sales. By providing ample product supply, strategic partners can focus their attention on expanding their business instead of just satisfying current product demand. In the future, Transcend will continue to put its efforts and resources into supporting local partners so they can achieve better performance in their individual markets.

Now start using gmail when you are offline

Web-based email is great because you can check it from any computer, but there's one little catch: it's inherently limited by your internet connection. From public WiFi to smartphones equipped with 3G, from mobile broadband cards to fledgling in-flight wireless on airplanes, Internet access is becoming more and more ubiquitous -- but there are still times when you can't access your webmail because of an unreliable or unavailable connection.

Today we're starting to roll out an experimental feature in Gmail Labs that should help fill in those gaps: offline Gmail. So even if you're offline, you can open your web browser, go to gmail.com, and get to your mail just like you're used to.

Once you turn on this feature, Gmail uses Gears to download a local cache of your mail. As long as you're connected to the network, that cache is synchronized with Gmail's servers. When you lose your connection, Gmail automatically switches to offline mode, and uses the data stored on your computer's hard drive instead of the information sent across the network. You can read messages, star and label them, and do all of the things you're used to doing while reading your webmail online. Any messages you send while offline will be placed in your outbox and automatically sent the next time Gmail detects a connection. And if you're on an unreliable or slow connection (like when you're "borrowing" your neighbor's wireless), you can choose to use "flaky connection mode," which is somewhere in between: it uses the local cache as if you were disconnected, but still synchronizes your mail with the server in the background. Our goal is to provide nearly the same browser-based Gmail experience whether you're using the data cached on your computer or talking directly to the server.


Offline Gmail is still an early experimental feature, so don't be surprised if you run into some kinks that haven't been completely ironed out yet. We've been using offline Gmail internally at Google for quite a while (I've read thousands of messages and answered hundreds en route to visit my son and my daughter). And it's saved me more than once when my home network connection ran into issues (we have squirrels at home that love to chew through outside cable wires). Now we're ready to have a larger set of people try it out, so we're making it available in Gmail Labs for those of you who want to test out Gmail's latest and greatest and send us your feedback.

We're making offline Gmail available to everyone who uses Gmail in US or UK English over the next couple of days, so if you don't see it under the Labs tab
yet, it should be there soon. Once you see it, just follow these steps to get started:
  1. Click Settings and click the Labs tab.
  2. Select Enable next to Offline Gmail.
  3. Click Save Changes.
  4. After your browser reloads, you'll see a new "Offline0.1" link in the upper righthand corner of your account, next to your username. Click this link to start the offline set up process and download Gears if you don't already have it.

Watch video's in Gmail Chat box

See this new feature from Google Gmail Team.Now you can see the videos in your chat box when u pass some video links of youtube as well as google videos.

If you receive (or send) a link to a video in a chat message, you'll see a preview of the video right in your chat window.


Click the preview, and the video will play right there. Just remember to say something every once in a while or your friends will probably catch on that you're enjoying the dramatic chipmunk more than their conversation...