Today when I was doing something my colleague asked me about what version of JSP and Servlet are you using. Untill now I never bothered about this, but later found a way for this. below are the lines of code to know what version of servlet you are running, version of JSP and application server you are running.
Servlet Version :
<%= session.getServletContext().getMajorVersion() %>.
<%= session.getServletContext().getMinorVersion() %>
JSP Version :
<%= JspFactory.getDefaultFactory().getEngineInfo().
getSpecificationVersion()%>
Server Version : <%= application.getServerInfo()%>

How to Remove or Hide Or Block All Facebook Ads from Profile
Have you ever felt bored while looking at your facebook profile that has been surrounded by number of adds??? If yes then you can avoid those adds by doing some tricks. Below are the steps hope this will help a lot of frustrated people.
To remove all facebook ads from yours profile you have to follow below Instruction
# You must be firefox user ,If you don’t have firefox? [ Download free from here ]
# After that Install Greasemonkey Script From [ Here ] Remember to restart firefox after downloading Greasemonkey script and then install the below script
Remove All Facebook Ads – This script was changed to remove ads upon DOM insertion in a similar fashion to New Facebook Layout Ad Killer, rather than using the previous method of waiting for the DOM to load before removing ads. Unlike ‘New Facebook Layout Ad Killer’, this script still uses XPath.
Hide Facebook Ads – Hide “Facebook Flyer” adverts on Facebook left sidebar on homepage or profile page.
NoFacebookAds - Removes Facebook flyer and network adverts, including ’social adverts’ such as the annoying Danish barber adverts.
NoPirateQuestAds - Specific to PirateQuest ads, where it prevents any Facebook wall entries containing ads for “PirateQuest” from appearing.
SmartGWT Step by Step 2
Now I am going to show you how to use SmartGWT to develop rich user interface web application. 
At first, download the latest build of GWT from here.
Unzip it to any location in your Hard drive.
Now, add the Google Plugin in your Eclipse IDE. This plugin would help you to create, compile a GWT application and deploy it to the Google App Engine with few clicks only.
For Eclipse 3.3 (Europa):
Go to Help menu.
Select Software Updates.
Select Find and Install. In the dialog that appears, select Search for new features to install and click Next.
Click New Remote Site.
Enter a name for the update site (e.g. Google Update Site for Eclipse 3.3) and the following value for the URL: http://dl.google.com/eclipse/plugin/3.3. Click OK.
The newly-added site is checked to indicate that it will be searched for features to install. Click Finish.
In the subsequent Search Results dialog, select the checkbox for the update site (e.g. Google Update Site for Eclipse 3.3). This will install the plugin, a Google App Engine Java SDK and a Google Web Toolkit SDK. Click Next.
select I accept the terms in the license agreements. Click Next.
If you then select finish, there would be a prompt shown. The plugin is not signed so you must acknowledge that you are installing an unsigned feature. Click Install All.
You will then be asked be asked if you would like to restart Eclipse. Click Yes.
For Eclipse 3.4 (Ganymede):
Go to Help menu.
Select Software Updates.
In the Available Softwares tab, click on the “add site” button.
Put “http://dl.google.com/eclipse/plugin/3.4″ , click ok.
Back in the Available Software view, you should see a new update site named Google Update Site for Eclipse 3.4. Select the checkbox next to the new update site. This will install the plugin, a Google App Engine Java SDK and a Google Web Toolkit SDK. Click Install.
Review the features that you are about to install. Click Next.
Select I accept the terms in the license agreements. Click Next.
You will then be asked if you would like to restart Eclipse. Click Yes.
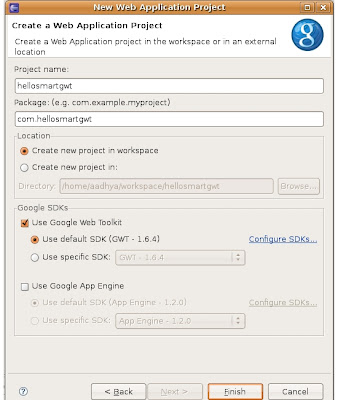
Now create a new project in eclipse. File-->New-->Other


Select Web Application Project and click on next as shown above.
Name the project whatever you like. I have choosen as 'hellosmartgwt' and give a package name whatever you want. Uncheck 'Use Google App Engine' if you are not inteded to using Google App Engine for hosting your application. Finally click on Finish button.

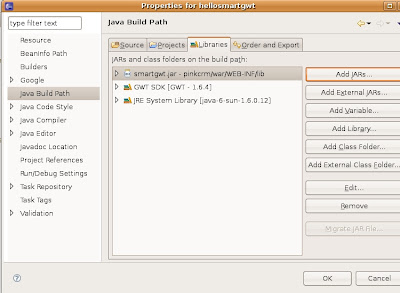
- Add the “smartgwt.jar” (form the unzipped folder) to your project libraries (Project –> Properties –> Java Build Path).

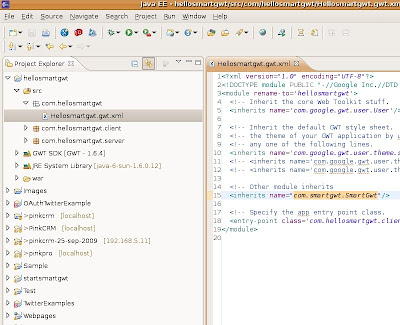
- Add
a line to inherit SmartGWt as shown below to the module xml file (Hellosmartgwt.gwt.xml) as shown below.

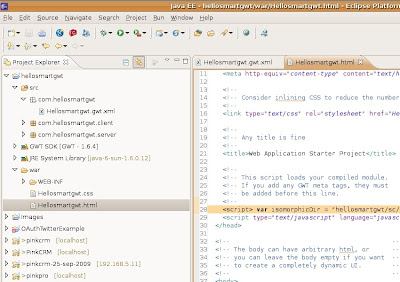
- Add <script> var isomorphicDir = hellosmartgwt/sc/"; script> to your host html file i.e to Hellosmartgwt.html which is inside war folder.

- Now open the Hellosmartgwt.java and replace with the following line of codes.
- package com.hellosmartgwt.client;
import com.google.gwt.core.client.EntryPoint;
import com.smartgwt.client.util.SC;
import com.smartgwt.client.widgets.IButton;
import com.smartgwt.client.widgets.events.ClickEvent;
import com.smartgwt.client.widgets.events.ClickHandler;
/**
* @author Sanjeev Kulkarni
* @since 0.5 - 30-Mar-2010 3:50:03 PM
* @version 0.1
*/
/**
* Entry point classes defineonModuleLoad().
*/
public class Hellosmartgwt implements EntryPoint {
@Override
public void onModuleLoad() {
IButton button = new IButton("Hello SmartGWT");
button.addClickHandler(new ClickHandler(){
@Override
public void onClick(ClickEvent event) {
SC.say("Hello world!!! This is SmartGWT!");
}
});
}
}
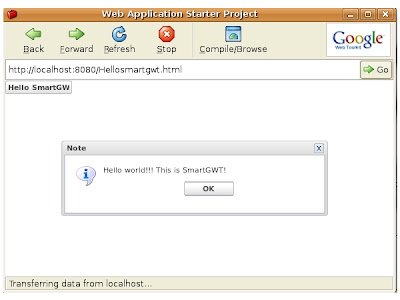
- Now you have completed the 1st program. Now it's time to run it. To run this right click on the project then goto Run As-->Web Application.
- This Completes the running of your project.

- Successefully completed running of helloworld example. You can continue to work on different examples whos source is available online from http://www.smartclient.com/smartgwt/showcase
- Thats it for SmartGWT Step by Step 2. If you need any further more reffer to smartgwt forum. Thank You.
SmartGWT Step by Step...
Hi, I am curious about this post as this post will attempt to teach you a very beautiful rich user interface backed by the SmartClient technology that is SamrtGWT.
Smart GWT is a GWT based web application framework that allows you to not only utilize its comprehensive widget library for your application UI, but also tie these widgets in with your server-side for data management. Smart GWT is based on the powerful and mature SmartClient library.
Smart GWT is a GWT based web application framework that allows you to not only utilize its comprehensive widget library for your application UI, but also tie these widgets in with your server-side for data management. Smart GWT is based on the powerful and mature SmartClient library.
Smart GWT is compatible with GWT 1.5.3 , GWT 1.6.4, GWT 1.7.x and GWT 2.0.x
So what's so smart about SmartGWT?
Let me try to explain. SmartGWT is not just another Widget library. While most Ajax frameworks focus primarily on presentation and displaying mostly read-only data, either local or via XML / JSON, SmartClient was built with server side integration in mind. Most enterprise applications are not just about about data presentation, but about being able to propagate data changes made by the user to the backend. So while its tempting to use library X that has a cool tree widget, it's not until you actually try to use it your application that you encounter the real world hard problems. For example, how do you take data from your business objects on the server to not only display in a tree widget, but also be able to update your data model when, say, the user reorders the tree nodes or make edits / deletes in the UI. How do you display hierarchical data where nodes may have hundreds of children? And so on..
Most Ajax frameworks stop short and leave it up to the user to manage state on the client side and propagating the changes to the server. This is not a trivial problem! Over the past few years UI widget libraries have improved significantly and there are now various options available to users. Simply put, having good looking widgets is not the hard problem today. In addition to having good looking widgets, having end-to-end integration of the UI components with the backend is the hard problem. It's this 20% of the functionality that takes 80% of the time in building most enterprise applications. Click here to read more about SmartGWT.
Now what is the difference between SmartClient and SmartGWT?
SmartGWT is a GWT wrapper around SmartClient LGPL. If you use SmartGWT, you build your UI using Java. If you use SmartClient LGPL directly, you build your UI using JavaScript. They both expose the same set of components and capabilities, so which one you use is a matter of existing skills and language preference.
Like SmartClient LGPL, SmartGWT does not require the SmartClient Server and works with any server technology (Java, .NET, PHP, etc).
Now have a look on the beauty of SmartGWT from the showcase here.
In the next post I will explain how to start using SamrtGWT. Be ready for it.
RCB Vs CSK Match-18 DLF IPL 2010. RCB won by 36 runs.
What an amazing match was that yesterday!!! Really was on toes when Robin Uttappa was smashing huge sixes all over the ground. All 6 sixes where massive, Chennai Super Kings learned great lesson by dropping two catches of Robin, he then not looked back and scored 68 off just 38 deliveries. What an innings that was! Earlier on Jack Kalis and Manish Pandey gave some what good opening, but Kalis was bowled out for the first time in this IPL 2010, and Pandey also got out without some big hits.
Royal Challengers Bangalore again did the same thing in the second innings i.e bowling in right direction and getting wickets. Dyle Styen bowled his highet speed deliveries 152km/h in some overs. His spell was superb but was bot success to get wickets. On the other hand Anil Kumble and R Vinay bowled really well along with intelegent bowler Praveen Kumar. Vinay captured his career best in 20-20 4 wickets including CSK's captain Suresh Raina.
At the end RCB won the match by 36 runs and they are again onthe top of list now. Hope this performance continues and RCB lifts DLF IPL 2010.
Subscribe to:
Posts (Atom)