An idea is like an itch: you need to scratch it, and when you do it feels better. As software developers, we spend a lot of time thinking up ideas for different kinds of applications. That's fun, right? What's challenging is figuring out how to bring a software product to fruition. It's satisfying to imagine something and then create it. The alternative (an unscratched itch) is just frustrating.
Just went through some good ideas thinking how to make them come true into the reality. Hope this time it happens! ll Keep scratching!!!

How to clear textarea's default text
Often there may be requirements that a html form with a textarea containing a default text clears automatically when someone selects/clicks on the textarea.
This is achieved as below.

This is achieved as below.

How to convert Byte[] array to String in Java
In some cases, we have to convert String variable into a Byte array format, for example, JCE encryption. However how do we convert a Byte[] array to String afterward?
Simple toString() function like following code is not working property. It will not display the original text but byte value.
String s = bytes.toString();In order to convert Byte array into String format correctly, we have to explicitly create a String object and assign the Byte array to it.
public class TestByte
{
public static void main(String[] argv) {

    String example = "This is an example";
    byte[] bytes = example.getBytes();

    System.out.println("Text : " + example);
    System.out.println("Text [Byte Format] : " + bytes);
    System.out.println("Text [Byte Format] : " + bytes.toString());

    String s = new String(bytes);
    System.out.println("Text Decryted : " + s);
  }
}
How to change the port number of tomcat?
Now today lets learn how to change the tomcat port number? Whether it is Apache Tomcat 5 or Tomcat 6, by default Apache Tomcat runs on port 8080. But there can be situations where there are some other servers running on this same port forcing you to change the port of one of the servers.
This article explains how to change this port 8080 on Tomcat (tested this against Apache Tomcat 5.5 and 6.0 versions).
Here we’ll be using label to denote the folder where Tomcat is installed. In my system, tomcat is installed in the following path.
C:\Java\Tomcat_x.x
We need to edit the file named server.xml inside \conf folder.

In the server.xml file; locate the following segment.
 After saving the changed server.xml file, Tomcat server must be restarted (stop then start) to activate the change. Hope you find it useful!
This article explains how to change this port 8080 on Tomcat (tested this against Apache Tomcat 5.5 and 6.0 versions).
Here we’ll be using label to denote the folder where Tomcat is installed. In my system, tomcat is installed in the following path.
C:\Java\Tomcat_x.x
We need to edit the file named server.xml inside \conf folder.
In the server.xml file; locate the following segment.


 After saving the changed server.xml file, Tomcat server must be restarted (stop then start) to activate the change. Hope you find it useful!
Time Picker using HTML and Java Script
Today while migrating the application, I was in need of having a textfield which takes time as an input. For this reason I needed a time picker, which will help the users to enter the time just by selecting something. I searched in web for this and found one from http://www.nogray.com/time_picker.php. This is very useful source for some most widely used javascripts like calendar, color picker, menubar etc.
Simple, basic but much needed things in java
It is often needed to convert one type of objects into another type in java. Below I have mentioned about these common types as they form basic foundation in java.
* How to convert String to boolean?
String listing = "true";
boolean theValue = Boolean.parseBoolean(listing);
* How to convert boolean to string?
public class BooleanToString {
public static void main(String[] args){
boolean b = true;
String s = new Boolean(b).toString();
System.out.println("String is:"+ s);
}
}
* How to converting string to date?
public class StringToDate {
public static void main(String[] args) {
try {
String str_date="11-June-07";
SimpleDateFormat formatter ;
Date date ;
formatter = new SimpleDateFormat("dd-MMM-yy");
date = (Date)formatter.parse(str_date);
System.out.println("Today is " +date );
}
catch (ParseException e)
{
System.out.println("Exception :"+e);
}
}
}
* How to convert date to string?
import java.util.*;
import java.text.*;
public class DateToString {
public static void main(String[] args) {
try {
DateFormat formatter ;
Date date ;
formatter = new SimpleDateFormat("dd-MMM-yy");
date = (Date)formatter.parse("11-June-07");
String s = formatter.format(date);
System.out.println("Today is " + s);
} catch (ParseException e)
{System.out.println("Exception :"+e); }
}
}
Clipboard Hack Problem - News about CTRL+C
Ctrl+C may be one of the most frequently used keyboard shortcuts we use every day. But it's not a very safe thing to do while you are surfing the internet.
Read on to know why.
What happens when you press Ctrl+C while you are online? We do copy various data by Ctrl + C for pasting elsewhere. This copied data is stored in clipboard and is accessible from the net by a combination of Java scripts and ASP. This is called clipboard hack problem.
Just try this:
1. Copy any text by Ctrl + C
2. Click the Link: http://www.sourcecodesworld.com/special/clipboard.asp
3. You will see the text you copied was accessed by this web page.
Surprised!. Do not keep sensitive data (like passwords, credit card numbers, PIN etc.) in the clipboard while surfing the web. It is extremely easy to extract the text stored in the clipboard to steal your sensitive information. It is true, text you last copied for pasting (copy & paste) can be stolen when you visit web sites using a combination of JavaScript and ASP (or PHP, or CGI) to write your possible passwords/credit card no./sensitive data to a database on another server.
How Clipboard Hack is done?
The Clipboard hack is done by the following Source Code:
How to safeguard yourself from Clipboard Hack Problem?
To avoid clipboard hack problem, do the following:
1. Go to internet options->security.
2. Press custom level.
3. In the security settings, select disable under Allow paste operations via script.
Now the contents of your clipboard are safe.
Interestingly, this hack works only on internet explorer, and not on Mozilla Firefox browser.
Please spread awareness of this issue with CTRL+C & help in preventing online-frauds…
Tears of Loss
When faced with the loss of someone or something special, we are overwhelmed with extreme sadness.  As a natural outlet, we break down into tears as we mourn over our loss. Yes, even the strongest of men can go through these moments.

To cry out these tears, is very healthy and therapeutic while we grieve over the loss and recover from it. To survive and move forward with our lives. Never forgetting, but rather growing from the experience.
With every tear drop, life memories fall from our head. The best of times, the worst of times, and even the possibilities of life after the loss. Life is present in every tear. In our mourning, we honor the relationship that once was.
As we recover, we turn to hope. Not in hope of filling the new emptiness, but in hope for new relationships and new memories. Learning from our past mistakes and successes to establish even greater connections with our current and future relationships.
The next time you find yourself shedding tears, remember the life in each drop. Life in yesterdays and hope for tomorrow.
How to find your Servlet, JSP and Server version?
Today when I was doing something my colleague asked me about what version of JSP and Servlet are you using. Untill now I never bothered about this, but later found a way for this. below are the lines of code to know what version of servlet you are running, version of JSP and application server you are running.
Servlet Version :
<%= session.getServletContext().getMajorVersion() %>.
<%= session.getServletContext().getMinorVersion() %>
JSP Version :
<%= JspFactory.getDefaultFactory().getEngineInfo().
getSpecificationVersion()%>
Server Version : <%= application.getServerInfo()%>
Servlet Version :
<%= session.getServletContext().getMajorVersion() %>.
<%= session.getServletContext().getMinorVersion() %>
JSP Version :
<%= JspFactory.getDefaultFactory().getEngineInfo().
getSpecificationVersion()%>
Server Version : <%= application.getServerInfo()%>
How to Remove or Hide Or Block All Facebook Ads from Profile
Have you ever felt bored while looking at your facebook profile that has been surrounded by number of adds??? If yes then you can avoid those adds by doing some tricks. Below are the steps hope this will help a lot of frustrated people.
To remove all facebook ads from yours profile you have to follow below Instruction
# You must be firefox user ,If you don’t have firefox? [ Download free from here ]
# After that Install Greasemonkey Script From [ Here ] Remember to restart firefox after downloading Greasemonkey script and then install the below script
Remove All Facebook Ads – This script was changed to remove ads upon DOM insertion in a similar fashion to New Facebook Layout Ad Killer, rather than using the previous method of waiting for the DOM to load before removing ads. Unlike ‘New Facebook Layout Ad Killer’, this script still uses XPath.
Hide Facebook Ads – Hide “Facebook Flyer” adverts on Facebook left sidebar on homepage or profile page.
NoFacebookAds - Removes Facebook flyer and network adverts, including ’social adverts’ such as the annoying Danish barber adverts.
NoPirateQuestAds - Specific to PirateQuest ads, where it prevents any Facebook wall entries containing ads for “PirateQuest” from appearing.
SmartGWT Step by Step 2
Now I am going to show you how to use SmartGWT to develop rich user interface web application. 
At first, download the latest build of GWT from here.
Unzip it to any location in your Hard drive.
Now, add the Google Plugin in your Eclipse IDE. This plugin would help you to create, compile a GWT application and deploy it to the Google App Engine with few clicks only.
For Eclipse 3.3 (Europa):
Go to Help menu.
Select Software Updates.
Select Find and Install. In the dialog that appears, select Search for new features to install and click Next.
Click New Remote Site.
Enter a name for the update site (e.g. Google Update Site for Eclipse 3.3) and the following value for the URL: http://dl.google.com/eclipse/plugin/3.3. Click OK.
The newly-added site is checked to indicate that it will be searched for features to install. Click Finish.
In the subsequent Search Results dialog, select the checkbox for the update site (e.g. Google Update Site for Eclipse 3.3). This will install the plugin, a Google App Engine Java SDK and a Google Web Toolkit SDK. Click Next.
select I accept the terms in the license agreements. Click Next.
If you then select finish, there would be a prompt shown. The plugin is not signed so you must acknowledge that you are installing an unsigned feature. Click Install All.
You will then be asked be asked if you would like to restart Eclipse. Click Yes.
For Eclipse 3.4 (Ganymede):
Go to Help menu.
Select Software Updates.
In the Available Softwares tab, click on the “add site” button.
Put “http://dl.google.com/eclipse/plugin/3.4″ , click ok.
Back in the Available Software view, you should see a new update site named Google Update Site for Eclipse 3.4. Select the checkbox next to the new update site. This will install the plugin, a Google App Engine Java SDK and a Google Web Toolkit SDK. Click Install.
Review the features that you are about to install. Click Next.
Select I accept the terms in the license agreements. Click Next.
You will then be asked if you would like to restart Eclipse. Click Yes.
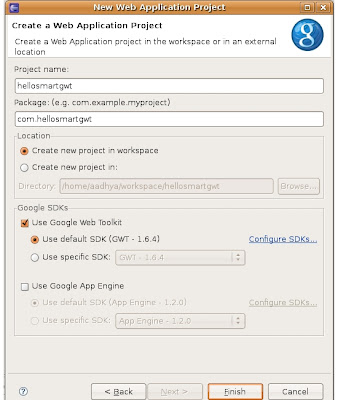
Now create a new project in eclipse. File-->New-->Other


Select Web Application Project and click on next as shown above.
Name the project whatever you like. I have choosen as 'hellosmartgwt' and give a package name whatever you want. Uncheck 'Use Google App Engine' if you are not inteded to using Google App Engine for hosting your application. Finally click on Finish button.

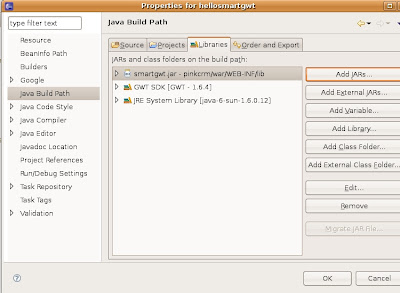
- Add the “smartgwt.jar” (form the unzipped folder) to your project libraries (Project –> Properties –> Java Build Path).

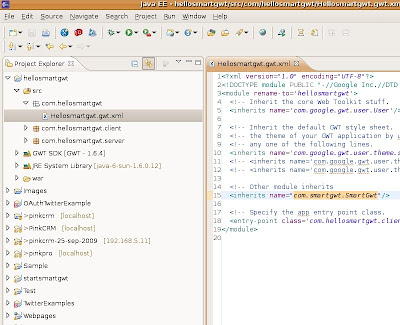
- Add
a line to inherit SmartGWt as shown below to the module xml file (Hellosmartgwt.gwt.xml) as shown below.

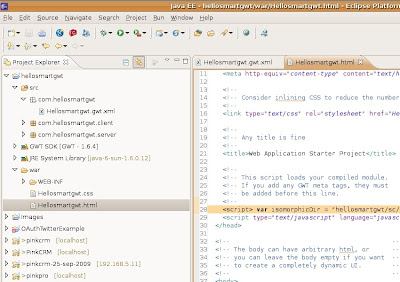
- Add <script> var isomorphicDir = hellosmartgwt/sc/"; script> to your host html file i.e to Hellosmartgwt.html which is inside war folder.

- Now open the Hellosmartgwt.java and replace with the following line of codes.
- package com.hellosmartgwt.client;
import com.google.gwt.core.client.EntryPoint;
import com.smartgwt.client.util.SC;
import com.smartgwt.client.widgets.IButton;
import com.smartgwt.client.widgets.events.ClickEvent;
import com.smartgwt.client.widgets.events.ClickHandler;
/**
* @author Sanjeev Kulkarni
* @since 0.5 - 30-Mar-2010 3:50:03 PM
* @version 0.1
*/
/**
* Entry point classes defineonModuleLoad().
*/
public class Hellosmartgwt implements EntryPoint {
@Override
public void onModuleLoad() {
IButton button = new IButton("Hello SmartGWT");
button.addClickHandler(new ClickHandler(){
@Override
public void onClick(ClickEvent event) {
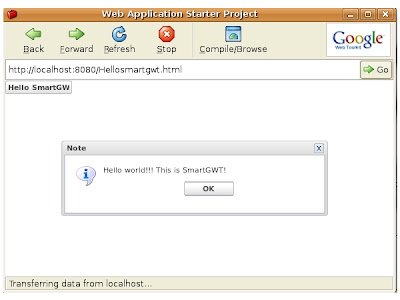
SC.say("Hello world!!! This is SmartGWT!");
}
});
}
}
- Now you have completed the 1st program. Now it's time to run it. To run this right click on the project then goto Run As-->Web Application.
- This Completes the running of your project.

- Successefully completed running of helloworld example. You can continue to work on different examples whos source is available online from http://www.smartclient.com/smartgwt/showcase
- Thats it for SmartGWT Step by Step 2. If you need any further more reffer to smartgwt forum. Thank You.
SmartGWT Step by Step...
Hi, I am curious about this post as this post will attempt to teach you a very beautiful rich user interface backed by the SmartClient technology that is SamrtGWT.
Smart GWT is a GWT based web application framework that allows you to not only utilize its comprehensive widget library for your application UI, but also tie these widgets in with your server-side for data management. Smart GWT is based on the powerful and mature SmartClient library.
Smart GWT is a GWT based web application framework that allows you to not only utilize its comprehensive widget library for your application UI, but also tie these widgets in with your server-side for data management. Smart GWT is based on the powerful and mature SmartClient library.
Smart GWT is compatible with GWT 1.5.3 , GWT 1.6.4, GWT 1.7.x and GWT 2.0.x
So what's so smart about SmartGWT?
Let me try to explain. SmartGWT is not just another Widget library. While most Ajax frameworks focus primarily on presentation and displaying mostly read-only data, either local or via XML / JSON, SmartClient was built with server side integration in mind. Most enterprise applications are not just about about data presentation, but about being able to propagate data changes made by the user to the backend. So while its tempting to use library X that has a cool tree widget, it's not until you actually try to use it your application that you encounter the real world hard problems. For example, how do you take data from your business objects on the server to not only display in a tree widget, but also be able to update your data model when, say, the user reorders the tree nodes or make edits / deletes in the UI. How do you display hierarchical data where nodes may have hundreds of children? And so on..
Most Ajax frameworks stop short and leave it up to the user to manage state on the client side and propagating the changes to the server. This is not a trivial problem! Over the past few years UI widget libraries have improved significantly and there are now various options available to users. Simply put, having good looking widgets is not the hard problem today. In addition to having good looking widgets, having end-to-end integration of the UI components with the backend is the hard problem. It's this 20% of the functionality that takes 80% of the time in building most enterprise applications. Click here to read more about SmartGWT.
Now what is the difference between SmartClient and SmartGWT?
SmartGWT is a GWT wrapper around SmartClient LGPL. If you use SmartGWT, you build your UI using Java. If you use SmartClient LGPL directly, you build your UI using JavaScript. They both expose the same set of components and capabilities, so which one you use is a matter of existing skills and language preference.
Like SmartClient LGPL, SmartGWT does not require the SmartClient Server and works with any server technology (Java, .NET, PHP, etc).
Now have a look on the beauty of SmartGWT from the showcase here.
In the next post I will explain how to start using SamrtGWT. Be ready for it.
RCB Vs CSK Match-18 DLF IPL 2010. RCB won by 36 runs.
What an amazing match was that yesterday!!! Really was on toes when Robin Uttappa was smashing huge sixes all over the ground. All 6 sixes where massive, Chennai Super Kings learned great lesson by dropping two catches of Robin, he then not looked back and scored 68 off just 38 deliveries. What an innings that was! Earlier on Jack Kalis and Manish Pandey gave some what good opening, but Kalis was bowled out for the first time in this IPL 2010, and Pandey also got out without some big hits.
Royal Challengers Bangalore again did the same thing in the second innings i.e bowling in right direction and getting wickets. Dyle Styen bowled his highet speed deliveries 152km/h in some overs. His spell was superb but was bot success to get wickets. On the other hand Anil Kumble and R Vinay bowled really well along with intelegent bowler Praveen Kumar. Vinay captured his career best in 20-20 4 wickets including CSK's captain Suresh Raina.
At the end RCB won the match by 36 runs and they are again onthe top of list now. Hope this performance continues and RCB lifts DLF IPL 2010.
How to Use Remote Desktop in Ubuntu 8.10
vino is VNC server for GNOME.VNC is a protocol that allows remote display of a user’s desktop. This package provides a VNC server that integrates with GNOME, allowing you to export your running desktop to another computer for remote use or diagnosis.
By default ubuntu will come with vino-server so it is very easy to configure to enable remote desktop 
Important note :-
Remote Desktop will only work if there’s a GNOME login session.Leaving your computer with an unattended GNOME login session is not secure and not recommended.
Some Tips
1) You can lock your screen using System--->Quit

Once you click on quit you should see the following screen here you need to select lockscreen

2) switch off your monitor when computer is left unattended
Configuring Remote Desktop
First you need to go to System -> Preferences -> Remote Desktop

Once it opens you should see the following screen

In the above screen you need to configure remote desktop preferences for sharing and security
For Sharing
you need to tick the box next to the following two options
Allow other users to view your desktop
Allow other users to control your desktop
For Security
you need to tick the box next to the following two options
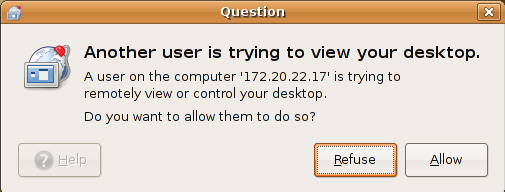
Ask you for confirmation (If you tick this option some one need to click on allow from remote desktop once it connected if you don’t want you can untick this option)
Require the user to enter this password:
Password: Specify the password

Connecting from Ubuntu Machine
Open your terminal from Applications--->Accessories--->Terminal and enter the following command
vncviewer -fullscreen 192.168.2.23:0
now you should see the following message asking for password enter the password after complete success you can see VNC authentication succeeded message and starting remote desktop
VNC viewer version 3.3.7 - built Jul 4 2006 10:04:48
Copyright (C) 2002-2003 RealVNC Ltd.
Copyright (C) 1994-2000 AT&T Laboratories Cambridge.
See http://www.realvnc.com for information on VNC.
VNC server supports protocol version 3.7 (viewer 3.3)
Password:
VNC authentication succeeded
If you want to quit vncviewer
Press ‘F8′ and select Quit viewer
Connecting from Windows machine
If you are trying to connect from your windows machine you need to install vncviewer of your choice i have installed from here http://www.realvnc.com/download.html.Install this program once you install this you can opem from start--->All programs--->RealVNC--->VNC Viewer 4--->Run VNC Viewer once it opens you should see the following screen here enter the remotemachine ipaddress:0 format and click ok

Now it will prompt for password enter your password and click ok

Now on the remote machine you should see the following screen asking for permission to allow this connection you need to click on allow this will comeup only if you tick “Ask you for confirmation” option under sharing
Once it connected you should see the remote machine desktop like the following screen

Subscribe to:
Posts (Atom)