Ctrl+C may be one of the most frequently used keyboard shortcuts we use every day. But it's not a very safe thing to do while you are surfing the internet.
Read on to know why.
What happens when you press Ctrl+C while you are online? We do copy various data by Ctrl + C for pasting elsewhere. This copied data is stored in clipboard and is accessible from the net by a combination of Java scripts and ASP. This is called clipboard hack problem.
Just try this:
1. Copy any text by Ctrl + C
2. Click the Link: http://www.sourcecodesworld.com/special/clipboard.asp
3. You will see the text you copied was accessed by this web page.
Surprised!. Do not keep sensitive data (like passwords, credit card numbers, PIN etc.) in the clipboard while surfing the web. It is extremely easy to extract the text stored in the clipboard to steal your sensitive information. It is true, text you last copied for pasting (copy & paste) can be stolen when you visit web sites using a combination of JavaScript and ASP (or PHP, or CGI) to write your possible passwords/credit card no./sensitive data to a database on another server.
How Clipboard Hack is done?
The Clipboard hack is done by the following Source Code:
How to safeguard yourself from Clipboard Hack Problem?
To avoid clipboard hack problem, do the following:
1. Go to internet options->security.
2. Press custom level.
3. In the security settings, select disable under Allow paste operations via script.
Now the contents of your clipboard are safe.
Interestingly, this hack works only on internet explorer, and not on Mozilla Firefox browser.
Please spread awareness of this issue with CTRL+C & help in preventing online-frauds…

Tears of Loss
When faced with the loss of someone or something special, we are overwhelmed with extreme sadness.  As a natural outlet, we break down into tears as we mourn over our loss. Yes, even the strongest of men can go through these moments.

To cry out these tears, is very healthy and therapeutic while we grieve over the loss and recover from it. To survive and move forward with our lives. Never forgetting, but rather growing from the experience.
With every tear drop, life memories fall from our head. The best of times, the worst of times, and even the possibilities of life after the loss. Life is present in every tear. In our mourning, we honor the relationship that once was.
As we recover, we turn to hope. Not in hope of filling the new emptiness, but in hope for new relationships and new memories. Learning from our past mistakes and successes to establish even greater connections with our current and future relationships.
The next time you find yourself shedding tears, remember the life in each drop. Life in yesterdays and hope for tomorrow.
How to find your Servlet, JSP and Server version?
Today when I was doing something my colleague asked me about what version of JSP and Servlet are you using. Untill now I never bothered about this, but later found a way for this. below are the lines of code to know what version of servlet you are running, version of JSP and application server you are running.
Servlet Version :
<%= session.getServletContext().getMajorVersion() %>.
<%= session.getServletContext().getMinorVersion() %>
JSP Version :
<%= JspFactory.getDefaultFactory().getEngineInfo().
getSpecificationVersion()%>
Server Version : <%= application.getServerInfo()%>
Servlet Version :
<%= session.getServletContext().getMajorVersion() %>.
<%= session.getServletContext().getMinorVersion() %>
JSP Version :
<%= JspFactory.getDefaultFactory().getEngineInfo().
getSpecificationVersion()%>
Server Version : <%= application.getServerInfo()%>
How to Remove or Hide Or Block All Facebook Ads from Profile
Have you ever felt bored while looking at your facebook profile that has been surrounded by number of adds??? If yes then you can avoid those adds by doing some tricks. Below are the steps hope this will help a lot of frustrated people.
To remove all facebook ads from yours profile you have to follow below Instruction
# You must be firefox user ,If you don’t have firefox? [ Download free from here ]
# After that Install Greasemonkey Script From [ Here ] Remember to restart firefox after downloading Greasemonkey script and then install the below script
Remove All Facebook Ads – This script was changed to remove ads upon DOM insertion in a similar fashion to New Facebook Layout Ad Killer, rather than using the previous method of waiting for the DOM to load before removing ads. Unlike ‘New Facebook Layout Ad Killer’, this script still uses XPath.
Hide Facebook Ads – Hide “Facebook Flyer” adverts on Facebook left sidebar on homepage or profile page.
NoFacebookAds - Removes Facebook flyer and network adverts, including ’social adverts’ such as the annoying Danish barber adverts.
NoPirateQuestAds - Specific to PirateQuest ads, where it prevents any Facebook wall entries containing ads for “PirateQuest” from appearing.
SmartGWT Step by Step 2
Now I am going to show you how to use SmartGWT to develop rich user interface web application. 
At first, download the latest build of GWT from here.
Unzip it to any location in your Hard drive.
Now, add the Google Plugin in your Eclipse IDE. This plugin would help you to create, compile a GWT application and deploy it to the Google App Engine with few clicks only.
For Eclipse 3.3 (Europa):
Go to Help menu.
Select Software Updates.
Select Find and Install. In the dialog that appears, select Search for new features to install and click Next.
Click New Remote Site.
Enter a name for the update site (e.g. Google Update Site for Eclipse 3.3) and the following value for the URL: http://dl.google.com/eclipse/plugin/3.3. Click OK.
The newly-added site is checked to indicate that it will be searched for features to install. Click Finish.
In the subsequent Search Results dialog, select the checkbox for the update site (e.g. Google Update Site for Eclipse 3.3). This will install the plugin, a Google App Engine Java SDK and a Google Web Toolkit SDK. Click Next.
select I accept the terms in the license agreements. Click Next.
If you then select finish, there would be a prompt shown. The plugin is not signed so you must acknowledge that you are installing an unsigned feature. Click Install All.
You will then be asked be asked if you would like to restart Eclipse. Click Yes.
For Eclipse 3.4 (Ganymede):
Go to Help menu.
Select Software Updates.
In the Available Softwares tab, click on the “add site” button.
Put “http://dl.google.com/eclipse/plugin/3.4″ , click ok.
Back in the Available Software view, you should see a new update site named Google Update Site for Eclipse 3.4. Select the checkbox next to the new update site. This will install the plugin, a Google App Engine Java SDK and a Google Web Toolkit SDK. Click Install.
Review the features that you are about to install. Click Next.
Select I accept the terms in the license agreements. Click Next.
You will then be asked if you would like to restart Eclipse. Click Yes.
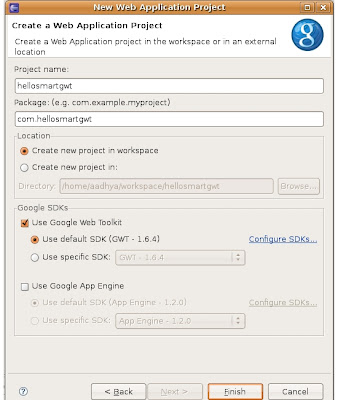
Now create a new project in eclipse. File-->New-->Other


Select Web Application Project and click on next as shown above.
Name the project whatever you like. I have choosen as 'hellosmartgwt' and give a package name whatever you want. Uncheck 'Use Google App Engine' if you are not inteded to using Google App Engine for hosting your application. Finally click on Finish button.

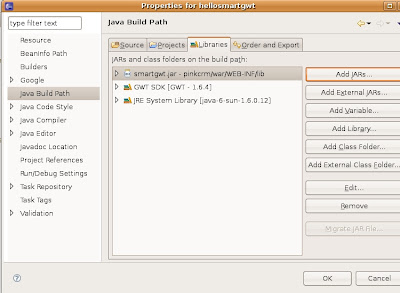
- Add the “smartgwt.jar” (form the unzipped folder) to your project libraries (Project –> Properties –> Java Build Path).

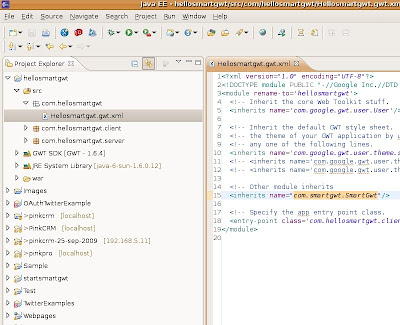
- Add
a line to inherit SmartGWt as shown below to the module xml file (Hellosmartgwt.gwt.xml) as shown below.

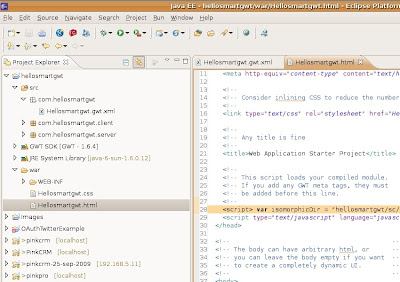
- Add <script> var isomorphicDir = hellosmartgwt/sc/"; script> to your host html file i.e to Hellosmartgwt.html which is inside war folder.

- Now open the Hellosmartgwt.java and replace with the following line of codes.
- package com.hellosmartgwt.client;
import com.google.gwt.core.client.EntryPoint;
import com.smartgwt.client.util.SC;
import com.smartgwt.client.widgets.IButton;
import com.smartgwt.client.widgets.events.ClickEvent;
import com.smartgwt.client.widgets.events.ClickHandler;
/**
* @author Sanjeev Kulkarni
* @since 0.5 - 30-Mar-2010 3:50:03 PM
* @version 0.1
*/
/**
* Entry point classes defineonModuleLoad().
*/
public class Hellosmartgwt implements EntryPoint {
@Override
public void onModuleLoad() {
IButton button = new IButton("Hello SmartGWT");
button.addClickHandler(new ClickHandler(){
@Override
public void onClick(ClickEvent event) {
SC.say("Hello world!!! This is SmartGWT!");
}
});
}
}
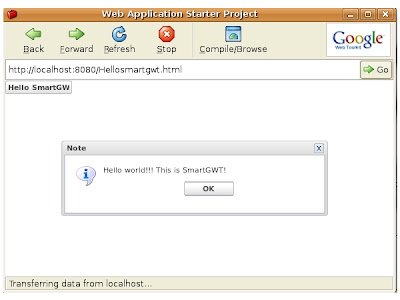
- Now you have completed the 1st program. Now it's time to run it. To run this right click on the project then goto Run As-->Web Application.
- This Completes the running of your project.

- Successefully completed running of helloworld example. You can continue to work on different examples whos source is available online from http://www.smartclient.com/smartgwt/showcase
- Thats it for SmartGWT Step by Step 2. If you need any further more reffer to smartgwt forum. Thank You.
Subscribe to:
Posts (Atom)