Home Surveillance – Real time Home monitoring using Skype

Consider that you are on a day out with your family and then you want to know how safe your house is without spending much! – What to do? And how to do? How to avoid spending money over home surveillance? If any of the questions arises in your mind then I have simple solution for you. After making this blog post into action you can relax and spend your time on your vocations without worrying much. This idea even helps to monitor your babies at home!

Isn’t it sounds great? So let’s get started with Home Surveillance set up:

What you need to have:
  • Laptop (or desktop) at home with webcam.
  • Internet with moderate bandwidth and speed.
  • Smartphone.
Procedure:
  • Download and install Skype from (http://www.skype.com/en/download-skype/skype-for-computer) on your home computer and create an account (let’s say home_skype).
  • Download and install Skype from (http://www.skype.com/en/download-skype/skype-for-mobile/) on your smartphone and create another account (let’s say mobile_skype).
  • Add each other’s Skype account into respective friend list.
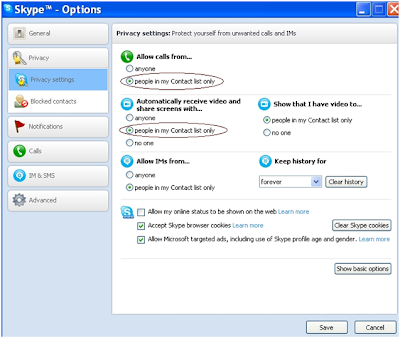
  • In your home_skype account, go to Tools->Options->Privacy, click on “show advanced options” and set the following:
  • Set “Allow calls from” to “people in my contact list only”
  • Set “Automatically receive video and share screens with” to “people in my contact list only

A screenshot of the settings:


That’s it. All the settings are done. You don’t have to do these on your mobile_skype account

Typical use case scenario:

Login to Skype into the home laptop (home_skype account) and place the laptop in your house in such a way that it faces the entrance (or any place that you want to monitor). Login to mobile_skype account on your smartphone and make a video call to the home_skype account.

Due to the above settings, the home laptop Skype account will automatically accept the call and start streaming the video to your smartphone and thus you will be able to monitor your home in real time and on demand basis by making video call to the home account any number of times a day.

Alternate components/devices:

If you do not have a smartphone, you can login to the mobile_account from any laptop/desktop and make a video call to home account to monitor in real time and on demand.

Alternate use cases:

-It can be used to monitor baby or the babysitter so that working parents can work peacefully in offices instead of worrying about issues like these:

http://articles.timesofindia.indiatimes.com/2009-11-06/bangalore/28106781_1_nanny-baby-parents

Tips:

-To save power, switch off the laptop screen and set the processor to low power mode.

-Ensure that it does not go into sleep mode after sometime.

-Ensure that you have an unlimited home broadband plan because being logged into skype for long time (even if you do not make calls) consumes bandwidth.

-If your webcam does not have sufficient coverage, you can fix convex lens in front of the camera to increase its coverage up to 180 degrees. Even door viewers like these can be used:

http://www.ebay.in/itm/Door-Viewer-Peephole-for-Home-Metal-180-Degree-/261232970230?pt=LH_DefaultDomain_203&hash=item3cd2b2c9f6&_uhb=1#ht_3951wt_1139

Uttarakand Flood


Flood affected people might have wished that even Pakistani/Chinese politicians might have helped them very well than our so called great government.  Bharat Nirman kaha ho raha hai? They are spending lacks of millions of crores over this Bharat Nirman advertisement. For what? Is it necessary?   


About Uttarakhand Calamity:
Kedaranath Temple

God Shiva statue in flood

Flood affected road

Flood of Uttarakand
Building collapsed due to heavy rain

1) Uttarakhand CM off to switzerland.
Flood effects in Uttarakand

2) RG celebrating in Spain ( #WhereisPappu ?). Don’t get confused RG means Rahul Ghandhi as people say but actually it’s Rahul Vinci as in his Italian passport. And politicians of our great UPA members call him as future Prime Minster of India? People just think at least once is he any way capable of holding that post? Doesn’t your blood boil over this? If no you should think over your patriotism. Is he a youth icon? What is the age you call a person a youth? He is crossed 40 and still a youth icon? Please don’t just agree with what people around you say. Open your eyes of knowledge my dear citizens.

Pappu came back from his luxury holidays in Europe after finishing as planned instead of boycotting his holidays while delaying rescue operations because Sonia madam wished his son should flag the operations. Playing politics over the Uttarakand flood is the worst’s of the worst days of my life!
Indian Army rescue camp

3) MMS/Sonia aerial survey costs vital rescue hours as entire air traffic is halted for hours.

4) Khurshid visiting Iraq with hundreds thousands of Crores (dollars) in aid, Bharat Nirman ads run in hundreds of crores but this devastating calamity is allocated mere 144 Crores.

5) Four choppers for Sonia's Rajasthan trip, but shortage of choppers to rescue people.

6) People asked to donate to PM fund even while available supplies lay undistributed.

7) Complete government machinery failure. Only hope being the Army, the RSS, Baba Ramdev and other such local volunteers.

8) Uttarakand CM refuses Narendra Modi’s offer of 24 choppers for rescue operation? For what sake Mr.Uttarakand CM? People are losing their lives without any food for survival and you people are playing politics over this issue also? Shame on you Mr.Uttarakand CM. Why you have not welcomed that helping hand it would have resulted in faster evacuation of affected people.
All of this while thousands, mostly Hindus and some Sikhs, are dying there of hunger, cold and injuries - and then this Manish Tiwary has the audacity to come on national TV and say "This is not the time to point fingers" !!!
Oh we're sorry. We should have complained about this to govt. of China or Pakistan maybe. We forgot that the govt of India is too good for its people. Well yes, after this is over you will wash away your failures with some match fixing or movie star suicide case. Just the way you did with Coal/Chopper scam. So when will it be really ok for people of India to point fingers at your government sir?
 
Please keep us posted on whenever you are comfortable with it.


May God save each and everyone affected in this bad situation...Hats off to Indian Army, RSS and the people who helped...
Indian Army Rescue operations. Hats off to them for their service. Not minding about their lives they saved many.

Indian Army Rescue operations. Hats off to them for their service. Not minding about their lives they saved many.

Google is helping to find the people. You can utilize the link below to find any person missing or provide the info if you found any one.

http://google.org/personfinder/2013-uttrakhand-floods

Hope that there should not be any scam of looting donation money by this government and all the money goes towards relief activities...Can’t say but I just hope... 

Loading of spring beans in a Servlet


Hi Folks,
I am back with a simple topic of how to load spring beans in a servlet. The provision is already present without the need to access the beans using WebApplicationContextUtils i.e. by implementing a factory class something like below:

1:  public class ServiceFactory {  
2:      public static RegistrationService getRegistrationService() {  
3:         RegistrationService registrationService = new RegistrationServiceImpl();  
4:      return registrationService;  
5:    }  
6:  }  

And then in a servlet calling this service like below:
1:  boolean saved = ServiceFactory.getRegistrationService().saveNewRegistration(user);  

But as another alternative if I want to invoke the spring beans using WebApplicationContextUtils will be something like below:
1:  RegistrationService registrationService;  
2:  @Override  
3:    public void init(ServletConfig config) throws ServletException {  
4:         super.init(config);  
5:         WebApplicationContext factory = WebApplicationContextUtils.getWebApplicationContext(config.getServletContext());  
6:         registrationService = factory.getBean(RegistrationService.class);  
7:    }  

And then use it like below:
1:  boolean saved = registrationService.saveNewRegistration(user);  

In order to achieve this we need to modify our web.xml like below:
1:   <context-param>  
2:        <param-name>contextConfigLocation</param-name>  
3:          <param-value>/WEB-INF/spring-context.xml</param-value>  
4:   </context-param>  
5:   <context-param>  
6:      <param-name>log4jConfigLocation</param-name>  
7:      <param-value>/WEB-INF/log4j.xml</param-value>  
8:   </context-param>  
9:   <listener>  
10:      <listener-class>org.springframework.web.context.ContextLoaderListener</listener-class>  
11:   </listener>  
12:   <listener>  
13:             <listener-class>  
14:                  org.springframework.web.context.ContextLoaderListener  
15:             </listener-class>  
16:   </listener>   

That’s all folks by having the above changes you should now be able to access spring beans in a servlet. Please get me in touch if you find any difficulty.

Learning OpenJPA step by step


 Hi Folks,

Java persistence framework is high on demand now days. If you mention JPA in your resume, it will catch hold of the interviewer and can influence in fetching you the job. (Ha ha I am not joking here! though some of you might be thinking :)-)

Ok lets come back to our topic JPA i.e. Java Persistence API.The Java Persistence API provides an object/relational mapping for managing relational data in enterprise beans, web components, and application clients. It can also be used in Java SE applications, outside of the Java EE environment.

Now we will try to understand practically how this will work.

1> Download and install latest eclipse IDE. In my case I have used Eclipse Indigo.
2> Download the latest apache tomcat. I have tomcat7.0
3> Once you have downloaded the tomcat extract it and keep it in a folder.
4> Now in eclipse IDE, select File > New > other and pick Server from the list.  

Click Next and select Tomcat v6.0 Server for the server definition. You'll need to
select a run time.

 Click on Add link and you will be prompted for the next window to add server runtime configurations.
Click on Browse button to add the location of tomcat directory where you have extracted the tomcat. Then click finish. Upon clicking finish it will take back you to previous window. In that also you click on Finish button.
Now you are done with server configurations. Now let’s start building a dynamic web project to learn JPA.
5> Click on File->New->Dynamic Web Project
Name your project and click on Next button.
No need to do anything, just click Next button.
Check generate web.xml checkbox and click on Finish.
Now you are done with creating dynamic web application! Congratulations! Now let’s add the required library files to the build path. Below are the required jar files.
ü       persistence-api-1.0.2.jar
ü       openjpa-all-2.2.0.jar
ü      mysql-connector-java-5.1.21-bin.jar (Off course I am using MySQL as my DB!)

To add these libraries to the build path of your project (off course you should download them before from the links provided and add them into you WEB-INF/lib location.) just right click on your project->Properties->Java Build Path.
Then click on add Add JARs button and then click on your project->Web Content->WEB-INF->lib then select the jars and click OK button.
Next go to Order and Export tab click on Select All button and then click on OK button.
6> Now let’s create our first entity. Note that we have used Java Annotations in this class.
Right click on the project->New->Class
Give the package name as com and class name as User and click on Finish button.

Now the contents of the class User is as below.

package com;

import java.io.Serializable;

import javax.persistence.Column;
import javax.persistence.Entity;
import javax.persistence.GeneratedValue;
import javax.persistence.GenerationType;

/**
@Author              : Sanjeev Kulkarni
@Created on          : 05-Oct-201212:25:13 PM
@Project             : a
@Package             :
@File                : User.java
@Comments            :

Revision History     :
Sl No. | Revision Date      | Changed By               | Reasons           
------------------------------------------------------------------------------------

 **/
@Entity(name="User")
public class User implements Serializable{
      
       private static final long serialVersionUID = 975983410088693889L;
      
       public User(){
             
       }

       @Column(name="id")
        @GeneratedValue(strategy=GenerationType.AUTO)

       private int id;
      
       @Column(name="name")
       private String name;

       public int getId() {
              return id;
       }

       public void setId(int id) {
              this.id = id;
       }

       public String getName() {
              return name;
       }
      

       public void setName(String name) {
              this.name = name;
       }
}


Now lets create a JSP page to print list of users from the database using openjpa.

Right click on project->New->Other->Web->JSP File and then click on Next button. Give the name of the file as NewFile.jsp and click Finish button.

Now copy and paste the content of NewFile.jsp as below.


<%@ page language="java" contentType="text/html; charset=ISO-8859-1"
    pageEncoding="ISO-8859-1"%>
<!DOCTYPE html PUBLIC "-//W3C//DTD HTML 4.01 Transitional//EN" "http://www.w3.org/TR/html4/loose.dtd">
<%@page import="javax.persistence.EntityManager"%>
<%@page import="javax.persistence.EntityManagerFactory"%>
<%@ page import="com.User" %>
<%@page import="javax.persistence.Persistence"%>
<%@page import= "javax.persistence.Query"%>
<html>
<head>
<meta http-equiv="Content-Type" content="text/html; charset=ISO-8859-1">
<title>::</title>
</head>
<body>

<%
 final EntityManagerFactory emf;
 final EntityManager em;
 final String PERSISTENCE_UNIT_NAME = "projectjpa";

try{
 emf = Persistence.createEntityManagerFactory("projectjpa");
 em = emf.createEntityManager();

 em.getTransaction().begin();

 User user = new User();
 Query query = em.createQuery("select x from User x ");

 out.println("Query returned: " + query.getResultList().size());
 em.getTransaction().commit();
 em.close();
 emf.close();
}
catch(Exception e){
       out.println(e);
       e.printStackTrace();
      
}

 %>
</body>
</html>


Modify the web.xml descriptor file. Mention NewFile.jsp as a welcome file.


xml version="1.0" encoding="UTF-8"?>
<web-app xmlns:xsi="http://www.w3.org/2001/XMLSchema-instance" xmlns="http://java.sun.com/xml/ns/javaee" xmlns:web="http://java.sun.com/xml/ns/javaee/web-app_2_5.xsd" xsi:schemaLocation="http://java.sun.com/xml/ns/javaee http://java.sun.com/xml/ns/javaee/web-app_3_0.xsd" id="WebApp_ID" version="3.0">
  <display-name>LearningOpneJPA</display-name>
  <welcome-file-list>
    <welcome-file>index.html</welcome-file>
    <welcome-file>index.htm</welcome-file>
    <welcome-file>NewFile.jsp</welcome-file>
    <welcome-file>default.html</welcome-file>
    <welcome-file>default.htm</welcome-file>
    <welcome-file>default.jsp</welcome-file>
  </welcome-file-list>
</web-app>


In the src folder create a folder called META-INF and inside that create a file called persistence.xml.
Copy and paste the below content into the persistence.xml file.


xml version="1.0" encoding="UTF-8"?>
<persistence version="1.0" xmlns="http://java.sun.com/xml/ns/persistence"
       xmlns:xsi="http://www.w3.org/2001/XMLSchema-instance"
       xsi:schemaLocation="http://java.sun.com/xml/ns/persistence
       http://java.sun.com/xml/ns/persistence/persistence_1_0.xsd">

       <persistence-unit name="projectjpa">
           <provider>org.apache.openjpa.persistence.PersistenceProviderImpl</provider>
              <class>com.User</class>

              <properties>
                     <property name="openjpa.ConnectionURL" value="jdbc:mysql://localhost:3306/test"/>
                     <property name="openjpa.ConnectionDriverName" value="com.mysql.jdbc.Driver"/>
                     <property name="openjpa.ConnectionUserName" value="root"/>
                     <property name="openjpa.ConnectionPassword" value="root"/>
                     <property name="openjpa.Log" value="DefaultLevel=WARN, Tool=INFO"/>
                    
                      <property name="openjpa.DynamicEnhancementAgent" value="false"/>
                     <property name="openjpa.RuntimeUnenhancedClasses" value="supported"/> 
              </properties>
       </persistence-unit>
</persistence>


7> Now open MySQL command prompt and create a database called test.
Mysql> create database test;
Mysql>use test;
Mysql>create table user (id int not null primary key, name varchar(200));
Mysql> insert into user vales(1,’ABC’);
Mysql> insert into user vales(2,’XYZ’);
8> Now right click on the project->Run As->Run on Server
9> You should be able to open the eclipse internal web browser and should be showed the result as below:
Query returned: 2